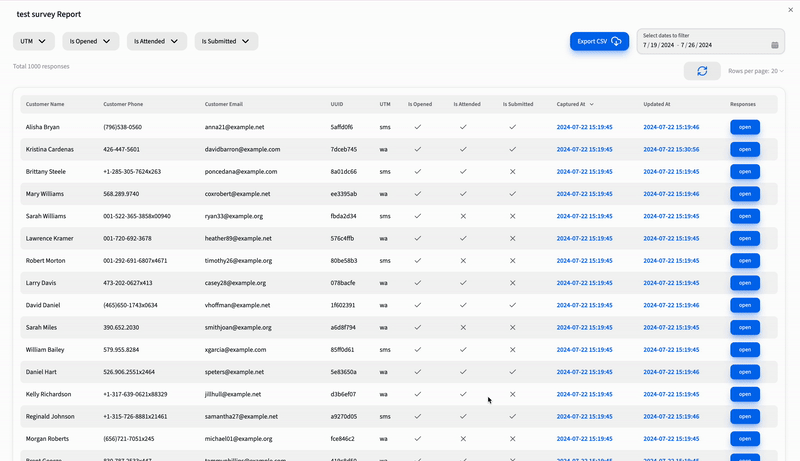
Reports Table with Pagination & CSV Download - Part 2
Implementing Reports Table with SWR and CSV Download using Asynchronous API and Node.js Worker
Hey there, tech enthusiasts! 👋🏻
In our previous adventure, we delved into crafting Reports Tables with pagination using NextUI and SWR. Today, we're cranking up the excitement by diving into the realm of CSV downloads with Asynchronous API and Node.js worker threads. Ready to elevate your data game? Let’s dive in! 🚀
Client Side Implementation
When the user clicks that Export CSV button, our client-side code fires up a request to the /reports/csv API. The server responds with a Job Id, your key to tracking the CSV generation. We then repeatedly call the /reports/csv?jobId=JOB_ID API every second until the CSV URL is ready. If the process takes more than 60-90 seconds, we terminate the operation and notify the user with a toast. Excited? Here’s a sneak peek at the implementation!
What is an Asynchronous API?
An asynchronous API is like having a superpower that lets your client request data while continuing with other tasks. Imagine needing to perform a long-running operation without triggering a timeout. Instead of holding a constant open connection, asynchronous APIs handle operations in the background. This means your client keeps moving while the server does the heavy lifting. Neat, right?
API Guide 📚
-
[POST] /reports/csv
Request Payload:
{
	"surveyId": "668b6fa3b8d693cd865b44bb",
	"from": "2024-7-19",
	"to": "2024-7-26",
	"filters": {
	"isAttended": true,
	"utm": "wa"
	}
}
Response:
{
	"data": "899e1228-d7b8-40fc-8490-70e6f1efb338"
}
Explanation: This request triggers the CSV generation. We send the survey details, date ranges, and filters, and in response, we receive a Job Id—a unique identifier for tracking our CSV task.
-
[GET] /reports/csv?jobId=JOB_ID
This status check API is to check with jobId which we got from the /reports/csv API’s response.
Response 1:
{
	"data": {
	"status": "in-progress",
	"progress": 0
	},
	"status": 200
}
Response 2:
{
	"data": {
	"status": "in-progress",
	"progress": 50
	},
	"status": 200
}
Response 3:
{
	"data": {
	"status": "done",
	"progress": 100,
	"url": "https://cl-survey-prelive.s3.ap-south-1.amazonaws.com/reports/668b6fa3b8d693cd865b44bb_1721981425424.csv?X-Amz-Algorithm=AWS4-HMAC-SHA256&X-Amz-Content-Sha256=UNSIGNED-PAYLOAD&X-Amz-Credential=AKIAVZMZ5BTSGAJXQLFE%2F20240726%2Fap-south-1%2Fs3%2Faws4_request&X-Amz-Date=20240726T081025Z&X-Amz-Expires=3600&X-Amz-Signature=be7726f9d25307ec3d8933d9e8c852071a0cb68ec50af4489ecac2125ae5ce9d&X-Amz-SignedHeaders=host&x-id=GetObject"
	},
	"status": 200
}
Explanation:
These responses keep you updated on the CSV generation progress. We keep polling until the status is done and we get the URL. If the process takes too long, we show a failure message.
With the client-side details in hand, let's switch gears to the server-side magic that makes this all possible 💻✨
Server Side Implementation
On the server side, we orchestrate a series of operations to manage CSV generation and status checks. Here’s how it all comes together:
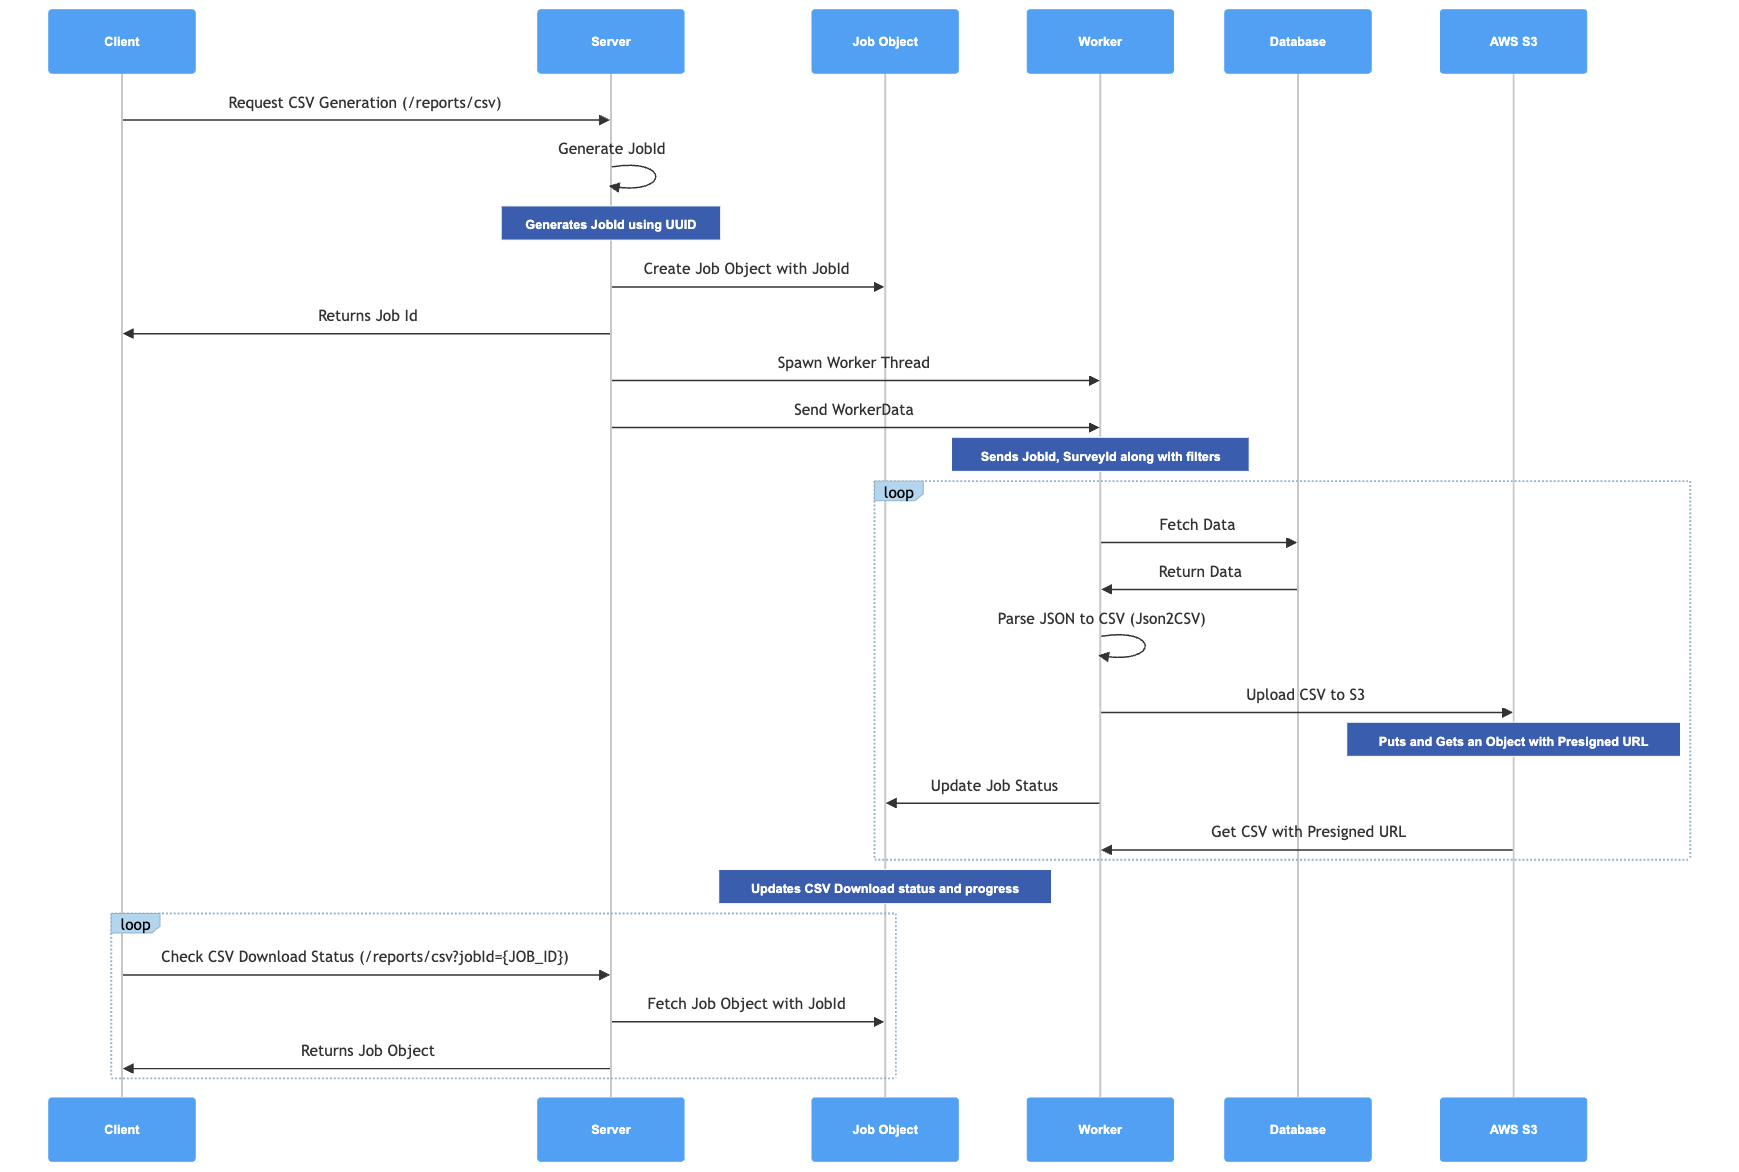
Sequence Diagram Breakdown
Here's a visual tour of how everything unfolds behind the scenes:
- Client Request:
- Action: The client sends a request to generate a CSV through the
/reports/csvAPI. - Details: This request includes parameters like survey ID, date ranges, and filters.
- Action: The client sends a request to generate a CSV through the
- Server JobId Generation:
- Action: The server whips up a unique JobId using UUID.
- Details: This JobId is a magical identifier that keeps track of each CSV generation request.
- Job Object Creation:
- Action: A job object is created on the server with the JobId and is returned to the client.
- Details: The job object holds the status, progress, and other crucial details of the CSV generation task.
- Worker Thread Spawn:
- Action: The server spawns a worker thread to handle the heavy lifting.
- Details: The worker is given the JobId, survey ID, and other necessary parameters to fetch and process data.
- Worker Operations:
- Action: The worker performs several tasks:
- Fetch Data: Retrieves the relevant data from the database.
- Parse Data to CSV: Converts the JSON data to CSV using Json2CSV.
- Upload to AWS S3: Uploads the CSV file to AWS S3 with a pre-signed URL for secure access.
- Update Job Status: Keeps the job status and progress updated.
- Action: The worker performs several tasks:
- Client Status Check:
- Action: The client periodically checks the status of the CSV download using the
/reports/csv?jobId={JOB_ID}API. - Details: This ensures the client can track the progress and eventually get the CSV URL.
- Action: The client periodically checks the status of the CSV download using the
- Completion:
- Action: Once the job is done, the server provides the CSV URL to the client.
- Details: The client can now download the freshly baked CSV file.
🧑🏻💻 Server Side Code
Here's the server-side code that drives our CSV download functionality. Crafted with Next.js and worker threads, this setup ensures efficient data processing.
Route.ts
import { IJobs, IReportsCSV } from '@/types/api/reports';
import { apiLogger } from '@/utils/apiLogger';
import { NextRequest, NextResponse } from 'next/server';
import { v4 as uuidv4 } from 'uuid';
import { Worker } from 'worker_threads';

const jobs: IJobs = {};

export async function POST(req: NextRequest) {
  try {
    const jobId = uuidv4();
    const reqBody: IReportsCSV = await req.json();
    const worker = new Worker('./app/api/reports/csv/csvWorker.ts', {
      workerData: {
	      jobId,
        params: {
          ...reqBody,
        },
        AWS_ACCESS_KEY_ID: process.env.AWS_ACCESS_KEY_ID,
        AWS_SECRET_ACCESS_KEY: process.env.AWS_SECRET_ACCESS_KEY,
        AWS_REGION: process.env.AWS_REGION,
        AWS_S3_BUCKET: process.env.AWS_S3_BUCKET,
      },
    });

    worker.on('message', data => {
      if (data.progress) {
        jobs[jobId].progress = data.progress;
      } else if (data.done) {
        jobs[jobId].status = 'done';
        jobs[jobId].url = data.url;
      } else if (data.error) {
        jobs[jobId].status = 'error';
        jobs[jobId].error = data.error;
      }
    });

    worker.on('error', error => {
      jobs[jobId].status = 'error';
      jobs[jobId].error = error.message;
    });

    worker.on('exit', code => {
      if (code !== 0) {
        jobs[jobId].status = 'error';
        jobs[jobId].error = `Worker stopped with exit code ${code}`;
      }
    });

    jobs[jobId] = { status: 'in-progress', progress: 0 };
    return NextResponse.json({ data: jobId }, { status: 200 });
  } catch (error) {
    return NextResponse.json(
      { error: `Internal Server Error: ${error}` },
      { status: 500 },
    );
  }
}

export async function GET(req: NextRequest) {
  try {
    const queryParams = req.nextUrl.searchParams;
    const jobId = queryParams.get('jobId');
    if (!jobId) throw new Error('Job Id parameter is missing');
    const job = jobs[jobId];
    if (job) {
      return NextResponse.json({
        data: job,
        status: 200,
      });
    }
    return NextResponse.json({
      message: 'Job Id not found!',
      status: 404,
    });
  } catch (err) {
    return NextResponse.json(
      { error: `Internal Server Error: ${err}` },
      { status: 500 },
    );
  }
}
This file handles two main endpoints:
- POST
/reports/csv: Starts a new CSV job and returns a JobId. - GET
/reports/csv?jobId={JOB_ID}: Checks job status and provides the CSV URL when ready.
csvWorker.ts
const {
  S3Client,
  PutObjectCommand,
  GetObjectCommand,
} = require('@aws-sdk/client-s3');
const { getSignedUrl } = require('@aws-sdk/s3-request-presigner');
const { PrismaClient } = require('@prisma/client');
const { Parser } = require('json2csv');
const { parentPort, workerData } = require('worker_threads');
const dayjs = require('dayjs');

const prisma = new PrismaClient();
const s3 = new S3Client({
  region: workerData.AWS_REGION,
  credentials: {
    accessKeyId: workerData.AWS_ACCESS_KEY_ID,
    secretAccessKey: workerData.AWS_SECRET_ACCESS_KEY,
  },
});

(async () => {
  const { jobId, params, AWS_S3_BUCKET } = workerData;
  try {
    const data = await fetchSurveyData(params);
    const csvData = await createCSV(data);

    const s3Key = `${params.surveyId}_${Date.now()}.csv`;
    const uploadParams = {
      Bucket: AWS_S3_BUCKET,
      Key: s3Key,
      Body: csvData,
      ContentType: 'text/csv',
    };

    const command = new PutObjectCommand(uploadParams);
    await s3Client.send(command);

    const getObjectParams = {
      Bucket: AWS_S3_BUCKET,
      Key: s3Key,
    };
    const url = await getSignedUrl(s3Client, new GetObjectCommand(getObjectParams), { expiresIn: 3600 });

    parentPort.postMessage({ done: true, url });
  } catch (error) {
    parentPort.postMessage({ error: error.message });
  }
})();
In this file, we handle:
- Fetching survey data: Retrieve data from the database.
- CSV creation: Convert data into CSV format.
- Uploading to S3: Store the CSV file on AWS S3.
- Generating a pre-signed URL: Provide a secure download link.
Summary 🚀
And that’s a wrap on our CSV crusade! 🚀✨ From button clicks to backend wizardry, you’ve just mastered the art of asynchronous magic and worker thread wonder. 🧙♂️💻
Stay funky, stay fabulous, and as always—happy coding! 👾